Most AI language models struggle with generating long, well-structured content. AI Autoblogger solves this by using a multi-step generation system that can create massive articles, books, and detailed guides while keeping the text coherent and logically organized.
The plugin first builds the article structure, then generates each section individually for better consistency and quality. It can also automatically create a table of contents, add section-based illustrations, and gives users full control over the entire generation process through flexible campaign settings.
Create a new campaign
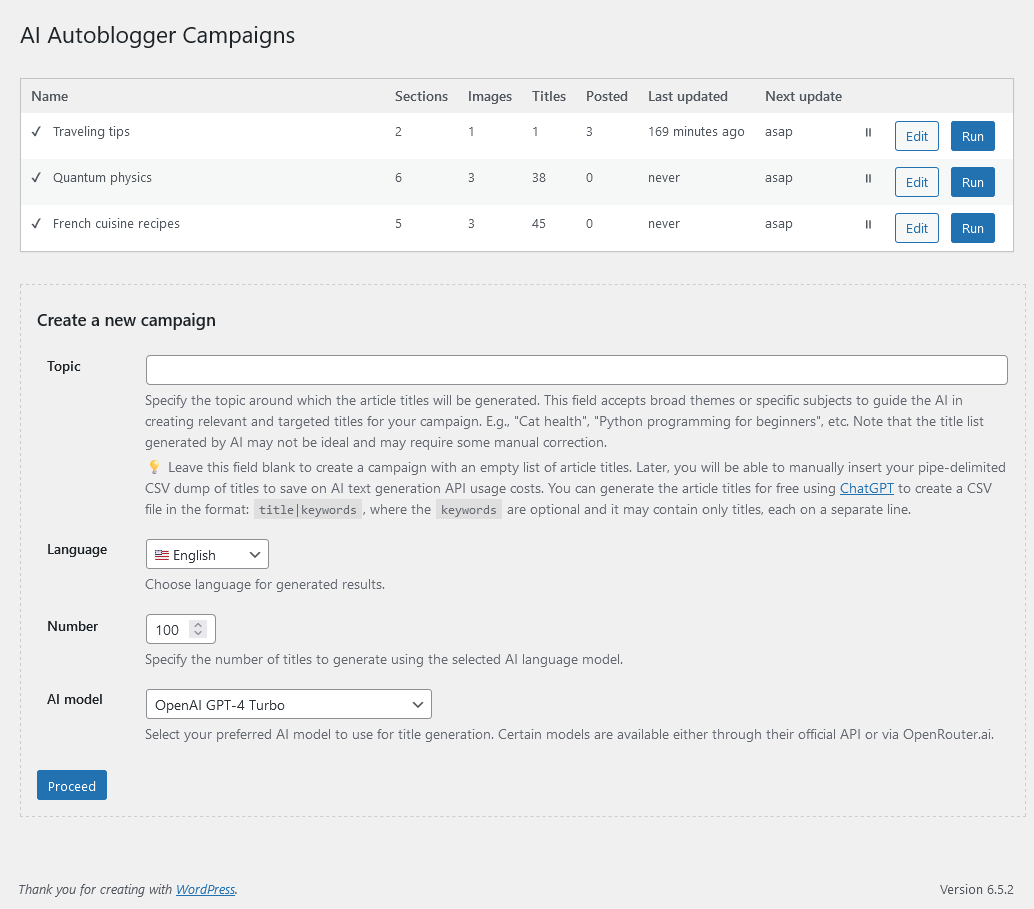
The "Create a new campaign" form is designed to initiate a new campaign. You can simply click the "Proceed" button to create a campaign with an empty list of article titles, which you can fill in later during the setup stage. For example, you might manually generate a list of titles using ChanGPT to save on API usage costs.
Alternatively, you can directly form a list of titles using this form. To do this, enter a topic for your campaign in the "Topic" field, such as "Learn the basics of cryptocurrency trading".
Be sure to select the target language from the drop-down menu, specify the desired number of article titles you wish to create, and choose the language AI model to be used for generation.
Please note that generating titles using a language AI model will take some time, so there will be a delay after clicking "Proceed" before you can access the settings page of your newly created campaign.
Edit campaign
After creating a new campaign or clicking the "Edit" button next to the name of an existing campaign in the list, you will be taken to the campaign settings editing menu. The settings are organized into categories, each of which is located on separate tabs. This layout helps you efficiently navigate through the various aspects of the campaign settings, allowing you to make precise adjustments in areas such as content generation, scheduling, language settings, and other customizable features according to your specific needs.
Articles
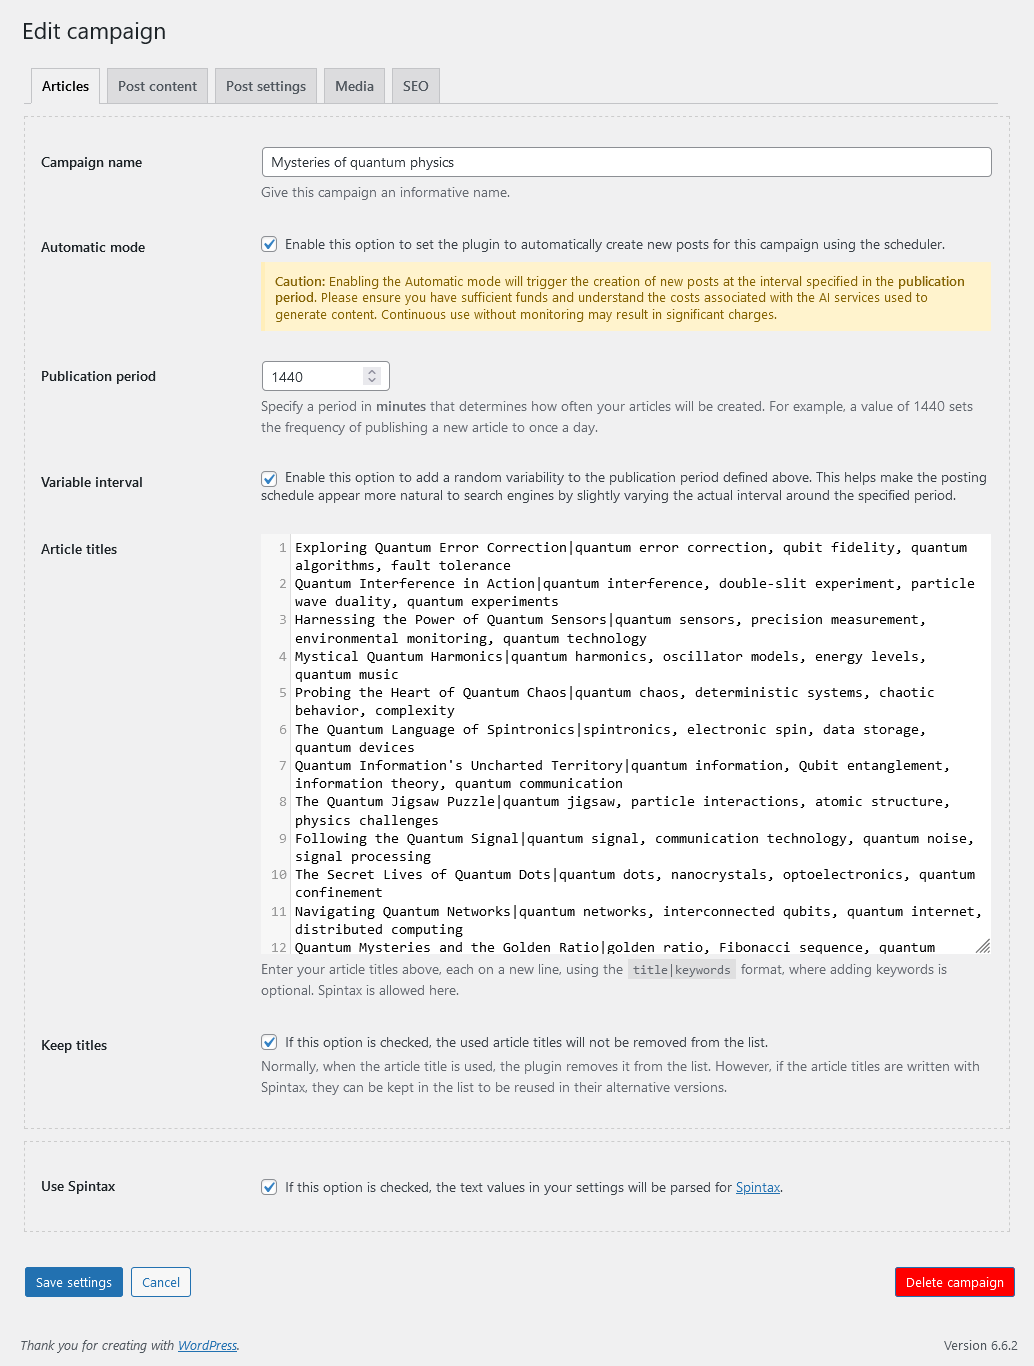
Campaign name
In this field, you can enter a unique name for your campaign that reflects its content. This will help you easily find the needed campaign in the overall list displayed on the main panel of AI Autoblogger.
Automatic Mode
By checking this box, the campaign you are editing will switch to automatic operation based on a scheduler. Remember that enabling Automatic Mode will trigger the creation of new posts at the intervals specified in the Publication Period. Please ensure you have sufficient funds and understand the costs associated with the AI services used to generate content. Continuous use without monitoring may result in significant charges.
Publication Period
If the "Automatic Mode" checkbox is enabled, the value of this field, given in minutes, sets the frequency at which each new article is generated for the campaign.
Variable interval
This option adds a random variation (up to ±30%) to the publication interval specified in the "Publication period" field. This helps create a more natural publishing schedule, which can reduce the risk of being flagged by search engines that may consider strictly timed, predictable publishing patterns to be inorganic. Use this option if you want your content schedule to appear more organic and less automated.
Article titles
In this text field, you can edit your list of titles for the articles to be generated. Each entry follows a CSV-like, pipe-delimited format:
title|keywords|custom data|...
The format begins with title, which is a mandatory component. The second element, keywords, is optional and can contain a comma-separated list of keywords. Following that, you can add any number of custom data elements, which can be used for various purposes within your plugin settings.
For example, a valid entry might look like:
My Awesome Article Title|keyword1, keyword2|tag 1, tag 2|HTML code to be placed below the article|my image prompt
Each element in a line is accessible as placeholders in different text fields of the plugin settings. These placeholders follow the format %%csv_fieldN%%, where N is the index of the element, starting from 0. Here's how the placeholders are mapped:
%%csv_field0%%: Always contains the title.%%csv_field1%%: Contains keywords, if provided.%%csv_field2%%, %%csv_field3%%, and so on: Represent the additional custom data fields.
These placeholders can be used in fields like text generation prompts and image generation prompts, wherever you see the description "Spintax and CSV placeholders are allowed here." This makes it possible to integrate your custom data into your automated content creation workflow.
The "Article Titles" text field supports Spintax, allowing you to generate multiple random titles from a single template. Here’s an example:
{Paris|London|San Francisco|New York|Madrid|Barcelona|Prague|Budapest|Bratislava|Rio de Janeiro|Venice} {travel|shopping|adventure} tips
Using this template, the plugin could generate titles like:
- New York shopping tips
- London travel tips
- Barcelona adventure tips
For additional customization, you can use custom data fields to assign unique tags to each article that are different from the keywords. Simply list these tags as part of the custom data. You can also specify styles for entire image generation prompts for each article, which can be used in the "Image prompt" to customize the visual content. These custom data fields are highly flexible and can be integrated into various plugin settings, such as "HTML before content", "HTML after content", and more.
The most obvious use of custom CSV data fields is in prompts for article text generation. For example, you can provide specific instructions for each article, highlighting key topics that the AI should emphasize. You might want an article written in a fun, engaging style that focuses on certain topics, or a more formal, technical article that includes detailed tables and highlights specific application areas. This allows you to direct the AI to generate content tailored to your needs, ensuring that each article is perfectly aligned with your vision and desired style.
The plugin supports any number of these custom CSV data fields, making them accessible in your campaign settings using placeholders like %%csv_field2%%, %%csv_field3%%, and beyond. However, avoid using %%csv_field0%% and %%csv_field1%% in prompts for generating text section lists or in the prompts for the text sections themselves. The plugin already handles article titles and keywords intelligently, so there’s no need to reference them explicitly in these contexts.
Keep titles
If this option is checked, the used article titles will not be removed from the list. Normally, when the article title is used, the plugin removes it from the list. However, if the article titles are written with Spintax, they can be kept in the list to be reused in their alternative versions.
Post content
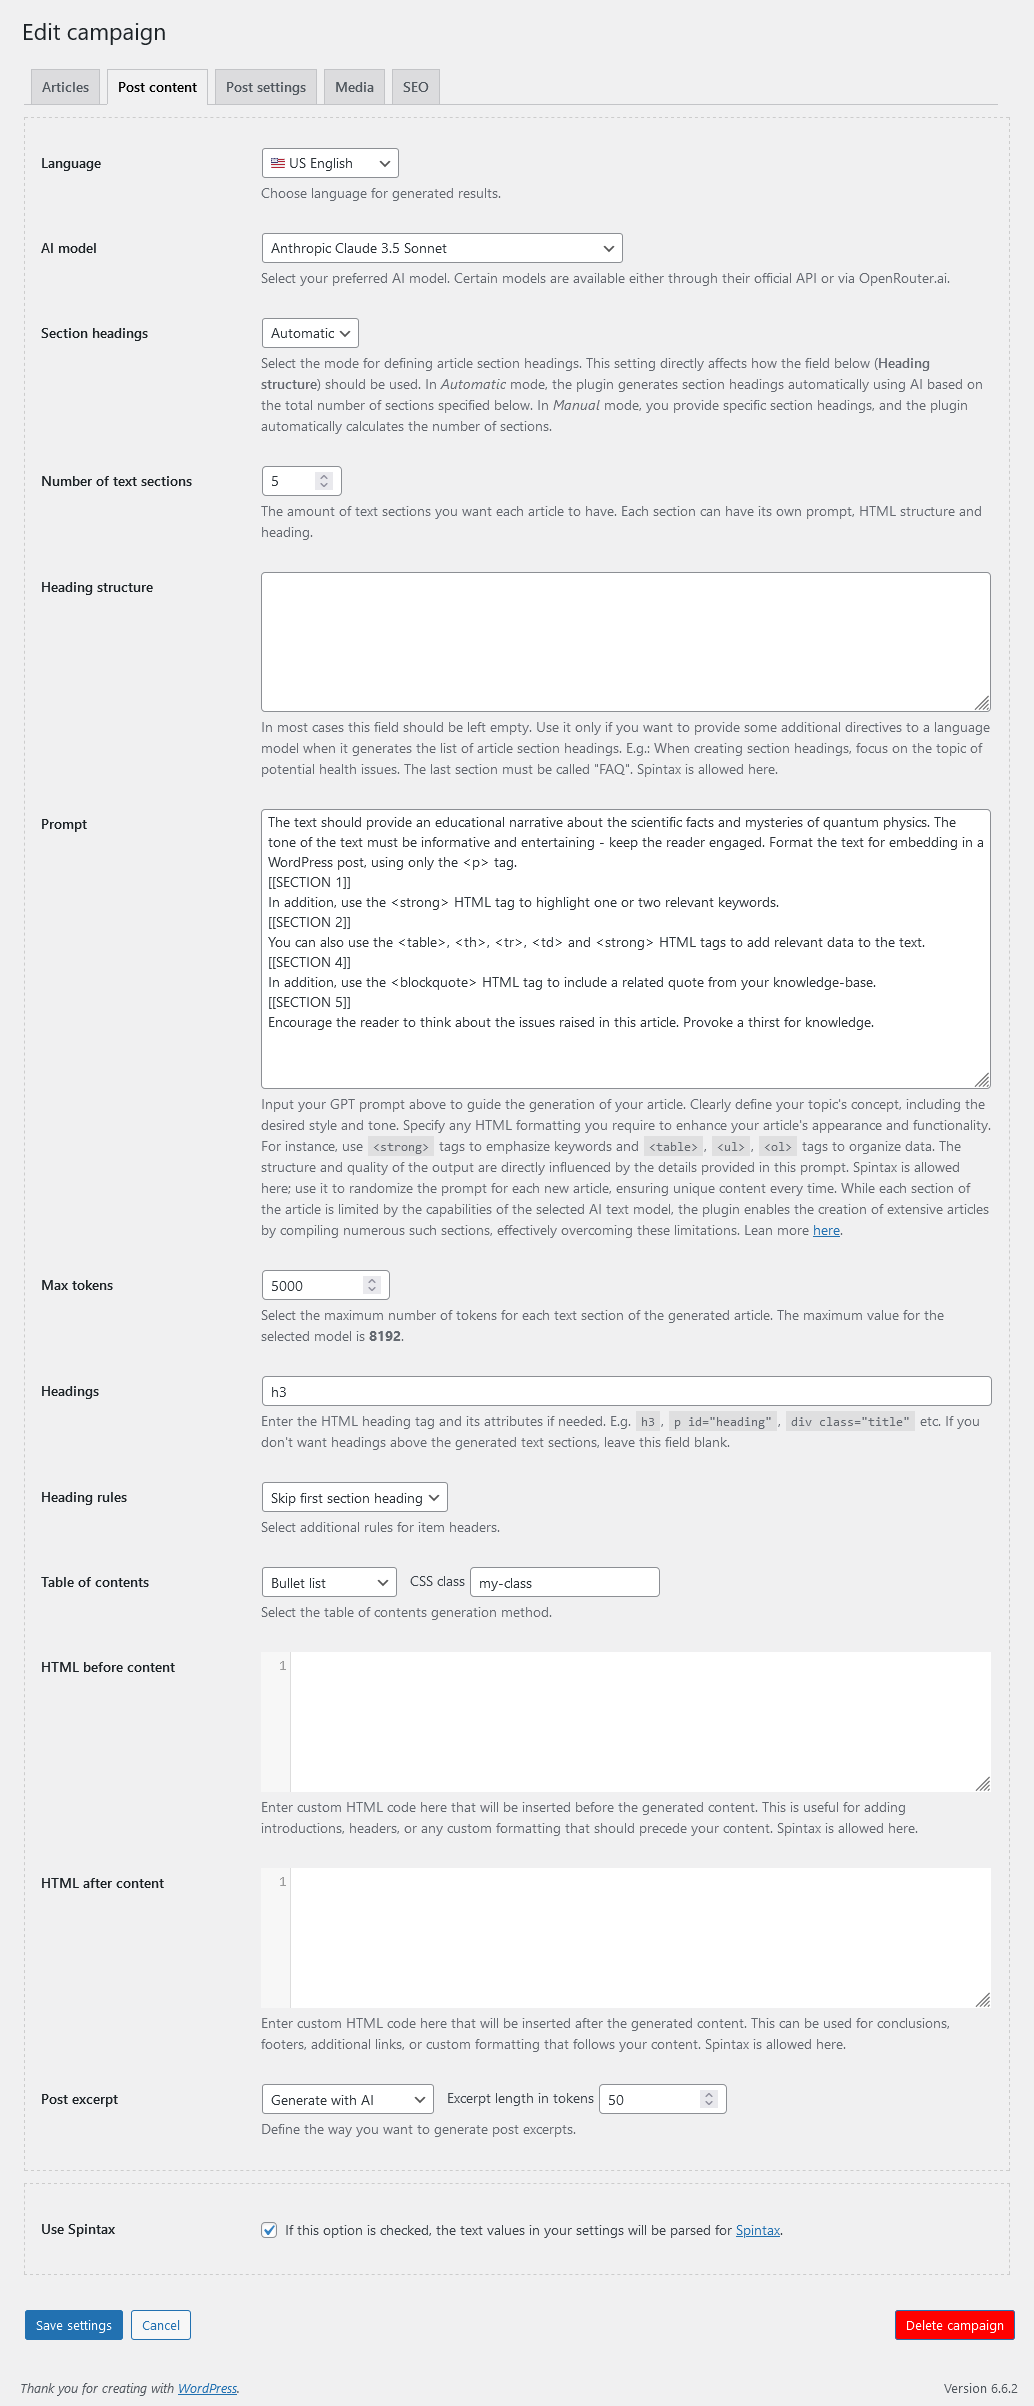
Language
Regardless of the language in which your prompt for generating an article is written, the plugin will create the article in the language selected from this drop-down menu. This feature ensures that your content is accessible and tailored to the specific audience you are targeting, regardless of the original language of the input.
Note that not all languages are supported by different AI models, and even for supported languages, the quality of the generated content can vary significantly. This variability can affect how well the content meets your needs, so it's important to choose the AI model that best matches your language requirements and desired level of quality.
AI model
Select a language model from the list of supported ones. Note that some models are available in two versions—through their official API and through a unified API provided by the OpenRouter service. OpenRouter offers access to various models from a single account, which simplifies tracking their usage and eases the management of your finances. This versatility allows you to choose the most efficient and cost-effective option for your content generation needs.
Characteristics of supported language AI models
| AI model |
Max size of each text section in the article |
Censored |
| OpenAI GPT-5.5 |
128000 tokens |
yes |
| OpenAI GPT-5.4 mini |
128000 tokens |
yes |
| OpenAI GPT-4o |
16384 tokens |
yes |
| OpenAI GPT-4o mini |
16384 tokens |
yes |
| Google Gemini 3 Pro Preview |
65536 tokens |
yes |
| Google Gemini 3 Flash Preview |
65536 tokens |
yes |
| Anthropic Claude Haiku 4.5 |
65536 tokens |
yes |
| Anthropic Claude Sonnet 4.6 |
65536 tokens |
yes |
| Anthropic Claude Opus 4.7 |
131072 tokens |
yes |
| xAI Grok 4.3 |
262144 tokens |
no |
| xAI Grok 3 mini |
131072 tokens |
no |
| OpenAI GPT-5.5 (OpenRouter) |
128000 tokens |
yes |
| OpenAI GPT-5.4 mini (OpenRouter) |
128000 tokens |
yes |
| OpenAI GPT-4o (OpenRouter) |
16384 tokens |
yes |
| OpenAI GPT-4o mini (OpenRouter) |
16384 tokens |
yes |
| Google Gemini 3 Pro Preview (OpenRouter) |
65536 tokens |
yes |
| Google Gemini 3 Flash Preview (OpenRouter) |
65536 tokens |
yes |
| Anthropic Claude Haiku 4.5 (OpenRouter) |
65536 tokens |
yes |
| Anthropic Claude Sonnet 4.6 (OpenRouter) |
65536 tokens |
yes |
| Anthropic Claude Opus 4.7 (OpenRouter) |
131072 tokens |
yes |
| xAI Grok 4.3 (OpenRouter) |
262144 tokens |
no |
| DeepSeek V3 (OpenRouter) |
65536 tokens |
no |
| Mistral Medium 3.5 (OpenRouter) |
262100 tokens |
no |
Live search
Enable this option to allow AI models running through OpenRouter to search the web for up-to-date information while generating content. This feature is useful for creating articles based on recent news, current events, trending topics, and other time-sensitive information that may not be included in the model’s training data.
When enabled, the plugin automatically activates OpenRouter’s live web search mode for supported models. This option has no effect on models that use their official APIs directly, such as OpenAI, Google Gemini, Anthropic Claude, or xAI Grok.
Section headings
This option allows you to choose how section headings are defined for your articles. There are two modes available:
- Automatic - the plugin uses AI to automatically generate section headings based on the number of sections specified in the "Number of text sections" setting. You can provide additional directives to guide the AI in the "Heading Structure Prompt" field, but this is optional.
- Manual - you can define the exact section headings you want for your article by listing them in the "Fixed Section Headings" field. Each heading must be provided on a separate line. In this mode, the number of sections is determined automatically based on the number of lines you provide, and this field cannot be empty.
Number of text sections
The amount of text sections you want each article to have. Each section can have its own prompt, HTML structure and heading.
Heading structure
The content of this field depends on the selected mode for "Section Headings":
- Automatic mode - Use this field to give additional instructions to the language model for generating section headings. You can leave it empty if no specific requirements are needed. Example: "When creating section headings, focus on the topic of potential health issues. The last section must be called 'FAQ'". Spintax is allowed here.
- Manual mode - enter your fixed section headings, with each heading on a separate line. This field must not be empty, as the plugin will use the headings you provide to determine the article's structure.
Prompt
This is where you will instruct the AI model on the topic and style of the articles for this campaign, as well as the HTML structure they should have. By default, language models generate content in plain text format, which means that the articles they generate do not contain any formatting. Therefore, if you need output that includes specific HTML tags, you must specify this explicitly in your prompt. For example, if you want to include tables in the text, clearly indicate in the prompt that the model can generate them using <table>, <tr>, and <td> tags. If you plan to generate instructional articles on programming that will contain code, provide in your prompt an example of a <div> setup so that your WP theme or a specialized plugin like Enlighter can display the code inserts with correct formatting and syntax highlighting.
When setting up prompts for AI Autoblogger, you have the flexibility to use both simple and compound formats. A simple prompt can consist of general instructions for generating all sections of an article. However, a composite prompt allows for more detailed customization for individual sections.
1. Simple prompt: This is used by the AI model to generate a list of section headings and to generate text for each section of the article.
main prompt for all sections
Example
Write engaging and informative text in a professional tone. Use <p> tags for paragraphs, <ul> and <li> tags for lists where appropriate, and ensure the text is engaging and informative. Avoid adding headings or titles; the plugin will handle them automatically.
2. Compound prompt: These are identified by markers such as [[SECTION 2]] followed by a prompt specific to that section. The section number indicates which section the additional prompt applies to.
main prompt for all sections
[[SECTION 2]]
section 2 prompt
[[SECTION 5]]
section 5 prompt
Example
Write engaging and informative text in a professional tone. Use <p> tags for paragraphs, <ul> and <li> for lists where necessary, and avoid headings or titles.
[[SECTION 1]]
Expand on the main topic with an in-depth explanation or analysis. Include a table for comparison using <table>, <tr>, and <td> tags. Ensure all content is cohesive and fits the broader context of the article.
[[SECTION 2]]
Provide a step-by-step explanation or instructional content. Use ordered lists (<ol> and <li>) where applicable. Maintain a clear and engaging style.
The section-specific prompts are appended to the main prompt when the text for that article section is generated. These prompts can be added in any order, and their number can be less than or equal to the number of sections. If the number exceeds the number of sections, the plugin will simply ignore the extra section prompts. This system allows you to specify unique prompts for certain sections to refine the writing style, provide specific content directives, or assign a unique HTML structure to each section.
However, it's important to note that while each section has its own prompt, the content generated for each section is not a standalone piece of text. Instead, it's an integral part of the overall article, designed to flow cohesively with both the preceding and following sections. This ensures that the entire article maintains thematic and contextual consistency, creating a unified and seamless reading experience from start to finish. The section prompts serve as a guide for shaping specific content, but the generated text is always contextually aware of the surrounding sections to preserve the overall narrative of the article.
Avoid giving direct instructions to create an article in your prompts. The language model should understand that it is writing text that is part of an article. Otherwise, it may begin to generate sections of text that include an introduction and a conclusion, which are not desirable for this particular application. It's important to ensure that the prompts are crafted in a way that directs the AI to produce content that fits into the broader context of the article, without redundant structural elements. This approach helps maintain the coherence and focus of each section, optimizing the overall quality and relevance of the content.
Note that your prompt can be written in Spintax, so each time a new article is generated, a new unique version of your prompt will be used.
Complete guide to prompt engineering for AI autoblogging.
Max tokens
Select the maximum number of tokens for each text section of the generated article. The value you enter should not exceed the maximum token count available from the selected model. Since all language AI models have significant limitations on the size of text they can generate at once, the AI Autoblogger plugin creates articles as a series of such sections. However, you can be confident that the content of these sections will be coherent and interconnected, ensuring the integrity of the articles. This structure allows for comprehensive articles while adhering to the technical constraints of AI models.
Headings
Enter the HTML heading tag and its attributes if needed. E.g. h3, p id="heading", div class="title" etc. If you don't want headings above the generated text sections, leave this field blank.
Heading rules
The following heading generation rules are available:
- All headings - a heading is added to each text section.
- Skip first section heading - a heading is added to each text section, except the first one.
- No headings - the text sections are without headings.
Table of contents
If you want to place a navigational table of contents above the generated article, with each link pointing to the corresponding text section, you can do so using this drop-down menu. The following options are available:
- Do not generate - the table of contents is not generated.
- Bullet list - the table of contents is formatted as a bulleted list.
- Numbered list - the table of contents is formatted as an ordered numbered list.
- Block of links - the table of contents is formatted as a div block of links.
For each format you choose for the table of contents, you can specify the name of its CSS class name. This allows you to specify its design.
HTML before content
Enter custom HTML code here that will be inserted before the generated content. This is useful for adding introductions, headers, or any custom formatting that should precede your content. Spintax is allowed here.
HTML after content
Enter custom HTML code here that will be inserted after the generated content. This can be used for conclusions, footers, additional links, or custom formatting that follows your content. Spintax is allowed here.
Post excerpt
Define the way you want to generate post excerpts. The following options are available:
- No excerpt - no excerpt will be generated.
- Based on post content - if this option is selected, you will be asked to specify the length in words of the article text to be used as an excerpt.
- Generate with AI - if this option is selected, you will be asked to specify the length of the excerpt in tokens. The excerpt will be generated by AI according to the content of the article.
Post settings
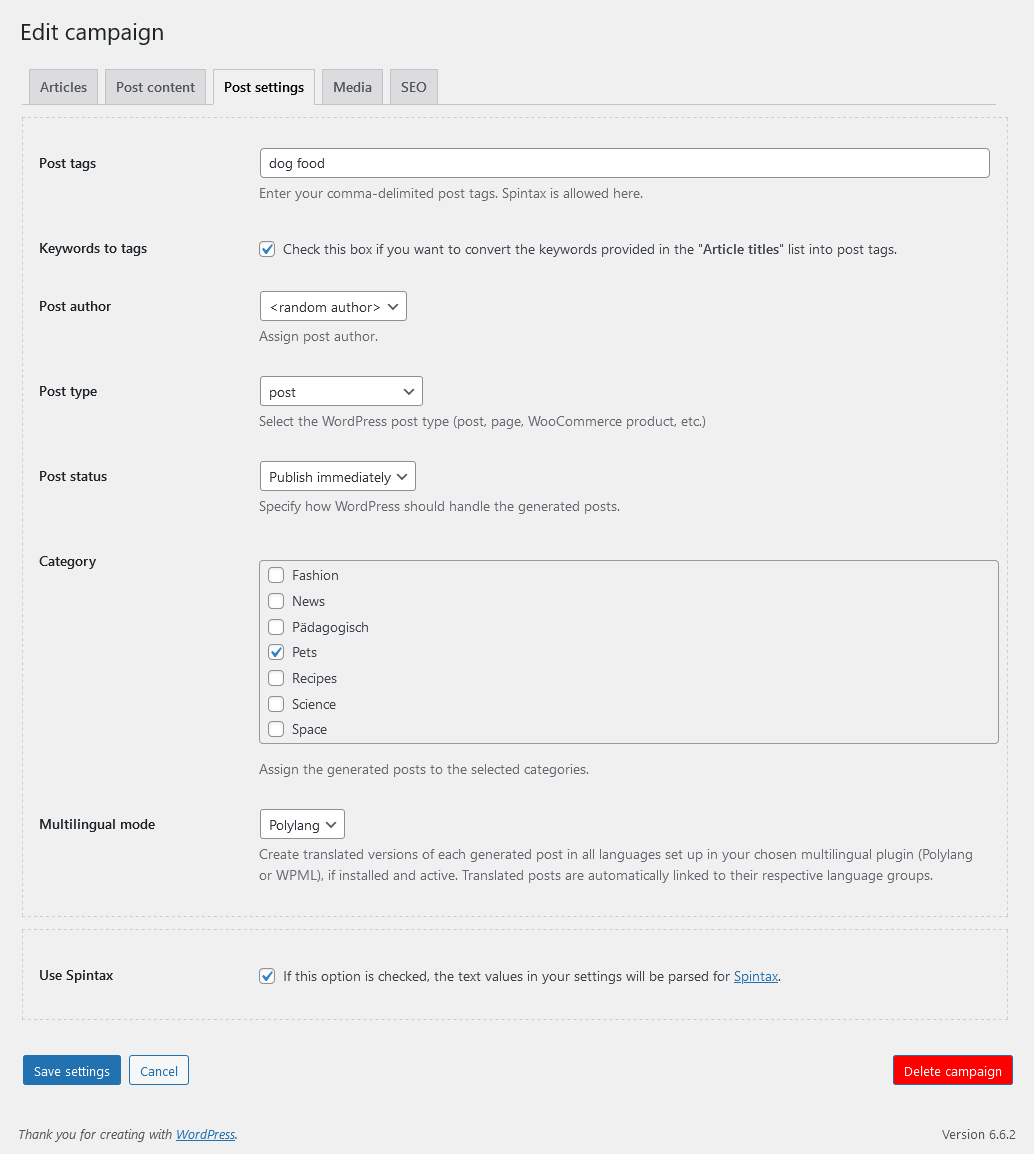
Post tags
Enter your comma-delimited post tags. Spintax is allowed here.
Keywords to tags
Check this box if you want to convert the keywords provided in the "Article titles" list into post tags.
Post author
Select the author of the post. If <random> is selected, the plugin will randomly select one of the authors registered in your WordPress system.
Post type
Select the WordPress post type (post, page, WooCommerce product, etc.)
Post status
Specify how WordPress should handle the generated posts. The following options are available:
- Publish immediately
- Hold for review
- Save as draft
- Save as private
Category
Assign the generated posts to the selected categories.
Multilingual mode
Use the "Multilingual mode" drop-down menu to enable multilingual mode. It has three options:
The Polylang and WPML options are available if the corresponding plugin is installed and enabled.
When Polylang or WPML is selected, AI Autoblogger will automatically generate posts with translations of the main article in all languages set in the active multilingual plugin's settings. This means that your content can reach a wider audience by providing articles in their preferred language, greatly improving user experience and engagement.
Using multilingual modes also provides a significant boost to SEO. Each translated version is treated as a separate page by search engines, which helps your content rank in local search results in different language regions, improving visibility and expanding your reach.
Please note that in Polylang and WPML modes, content generation will take longer. The time required is proportional to the number of additional translated posts created for each article. Each translation uses the same AI model that was used to generate the original article, ensuring consistent quality across all language versions.
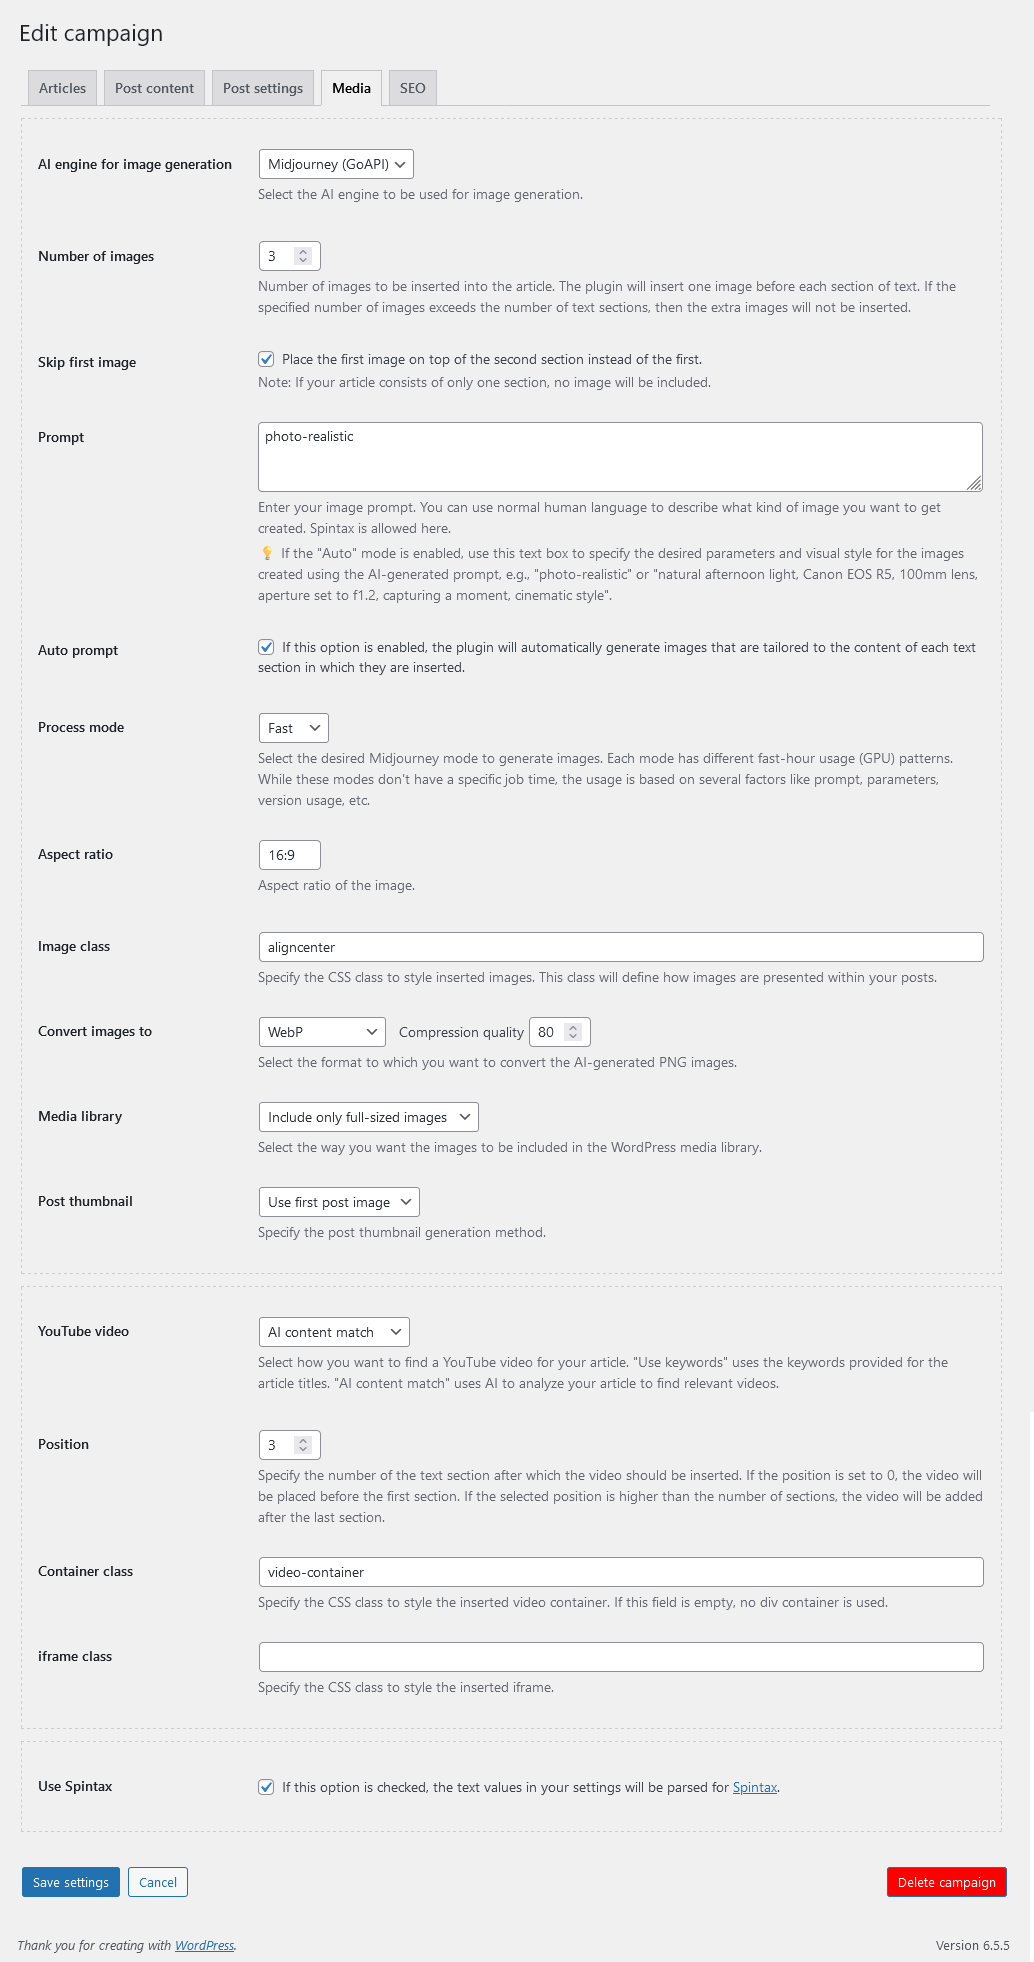
AI engine for image generation
In this drop-down menu you should select the AI model that will be used to generate the illustration for your articles. The following options are available:
- None
- Freepik
- Flux
- Midjourney
- Stable Diffusion
- DALL∙E
Note that while Freepik, Stable Diffusion and DALL∙E models are available directly through their official API, Midjourney and Flux require an API key provided by the CometAPI and GoAPI services.
After selecting a graphic AI model, you will see a menu for configuring its parameters, such as choosing the size of the generated images in pixels or their aspect ratio. The set of these settings will depend on the model you have chosen.
At the same time, there is a basic set of parameters that is common to all supported models, described below.
Number of images
Number of images to be inserted into the article. The plugin will insert one image before each section of text. If the specified number of images exceeds the number of text sections, then the extra images will not be inserted.
Skip first image
This checkbox allows you to control the placement of the first generated image in your AI-generated articles. By default, the first image is placed above the first text section. However, in some WordPress themes, this can result in an undesirable layout, with the featured image appearing above the post, followed immediately by the first image of the post itself, creating a redundant visual effect.
When you enable the "Skip First Image" option, the plugin will place the first generated image above the second text section instead of the first. This ensures that your featured image is distinct and does not overlap with the content images, maintaining a cleaner and more visually appealing layout.
Important Note: If your article consists of a single section of text and this option is enabled, there will be no images in the article.
Prompt
Enter your image prompt. You can use normal human language to describe what kind of image you want to get created. Spintax is allowed here.
If the "Auto" mode is enabled, use this text box to specify the desired parameters and visual style for the images created using the AI-generated prompt, e.g., "photo-realistic" or "natural afternoon light, Canon EOS R5, 100mm lens, aperture set to f1.2, capturing a moment, cinematic style".
Auto prompt
If this option is enabled, the plugin will automatically generate images that are tailored to the content of each text section in which they are inserted.
Image class
Specify the CSS class to style inserted images. This class will define how images are presented within your posts. By applying a CSS class to the <img> tag, you gain precise control over the appearance and behavior of the images in your WordPress posts. This allows you to customize various aspects such as borders, shadows, margins, padding, and alignment. For example, you can ensure that all images have a uniform border style, add shadows for a more polished look, or adjust the spacing around images to better integrate them with the surrounding text. Additionally, you can use responsive design techniques to ensure that images adjust appropriately to different screen sizes, enhancing the overall user experience on mobile and desktop devices.
For more information on image stylization, click here.
Convert images to
Use this menu to select the format to which you want to convert the AI-generated PNG images and to set the image compression quality. The following options are available:
By default, AI models generate images in PNG format, which can result in very large file sizes. Using this drop-down menu, you can enable their automatic conversion to JPEG and WebP formats, which compresses the images and significantly saves disk space on your server. In addition to selecting the format, you must also set the compression quality, which ranges from 10 (minimum file size and lowest image quality) to 100 (maximum file size and highest image quality).
Media library
Select the way you want the images to be included in the WordPress media library. The following options are available:
- Do not include images
- Include only full-sized images
- Create and include thumbnails
Post thumbnail
Specify the of post thumbnail (featured image) generation method. The following options are available:
- None - the post will not have a thumbnail image
- Create unique image - a new unique image will be generated
- Use first post image - the first image in the article will be used as the thumbnail for the post
YouTube video
A drop-down menu with values:
- No video (disabled)
- Use keywords
- AI content match
Choose how you want to find a YouTube video for your article. "Use keywords" uses the keywords provided for the article title. "AI content match" uses AI to analyze your article to find relevant videos.
Position
Specify the text section number after which the video should be inserted. If set to 0, the video will be placed before the first section. If the selected position exceeds the total number of sections, the video will be added after the last section.
Container class
Specify the CSS class to style the inserted video container. If this field is empty, no div container will be used. This allows users to customize the appearance and layout of the video within their posts. By defining a CSS class, you can control the video's alignment, margins, padding, and other styling properties to ensure that the video fits into the design of your WordPress posts. For example, you might want to add a border, background color, or specific spacing around the video to match your site's theme.
For example, if you enter the class name "video-container" in the Container class field and add the following style to your theme's style.css file or through the standard Customize->Additional CSS menu, all your YouTube video embeds will become responsive and will fit into the page design on any device (desktop, tablet, mobile):
.video-container {
    position: relative;
    padding-bottom: 56.25%;
    height: 0;
    overflow: hidden;
}

.video-container iframe {
    position: absolute;
    top: 0;
    left: 0;
    width: 100%;
    height: 100%;
}
iframe class
Specify the CSS class to style the inserted iframe. This allows for additional customization of the video itself. By assigning a CSS class to the iframe, you can control its size, border, aspect ratio, and other styling elements. This is especially useful if you want to ensure a consistent video presentation across all of your posts. For example, you could set a fixed width and height for all videos, remove default borders, or use responsive design techniques to ensure that videos look good on different devices and screen sizes.
SEO
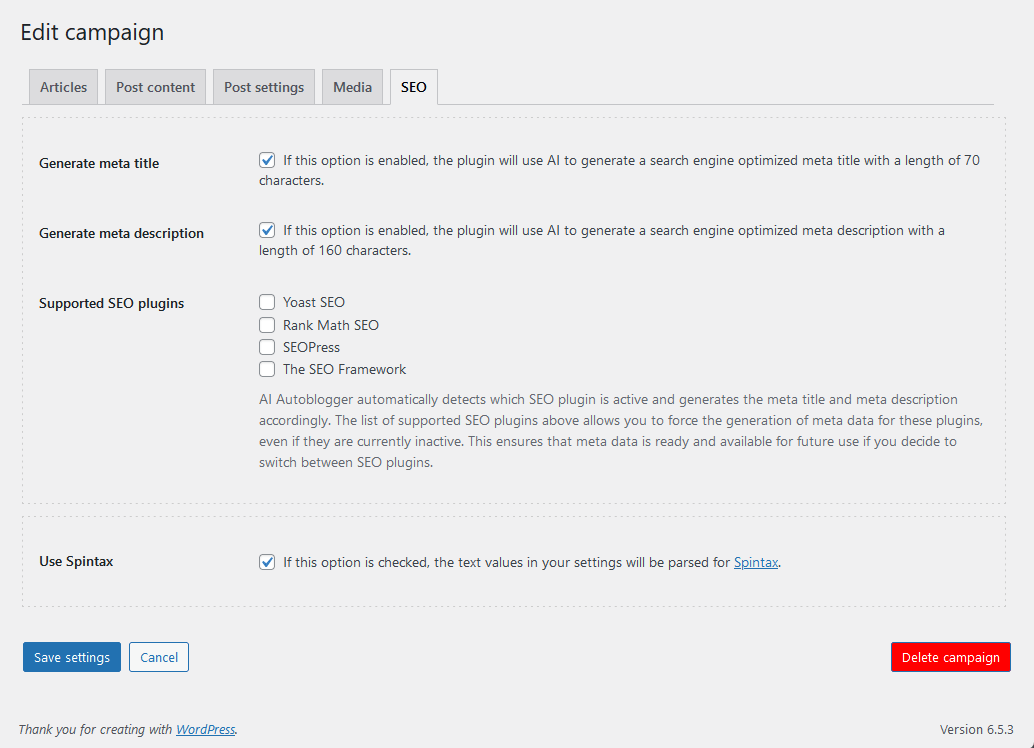
Generate meta title
If this option is enabled, the plugin will use AI to generate a search engine optimized meta title with a length of 70 characters. The plugin will analyze the content of the article, its title and keywords.
Generate meta description
If this option is enabled, the plugin will use AI to generate a search engine optimized meta description with a length of 160 characters. The plugin will analyze the content of the article, its title and keywords.
Supported SEO plugins
AI Autoblogger automatically detects which SEO plugin is active and generates the meta title and meta description accordingly. The list of supported SEO plugins above allows you to force the generation of meta data for these plugins, even if they are currently inactive. This ensures that meta data is ready and available for future use if you decide to switch between SEO plugins. The following SEO plugins are supported: